徒手撸一个扫码登录示例工程

本文参考:一灰灰,https://juejin.im/post/5e86971c518825736f640ce3

本篇示例工程,主要用到以下技术栈

  • qrcode-plugin:开源二维码生成工具包,项目链接:https://github.com/liuyueyi/quick-media
  • SpringBoot:项目基本环境
  • thymeleaf:页面渲染引擎
  • SSE/异步请求:服务端推送事件
  • js: 原生 js 的基本操作

I. 原理解析

聊一聊二维码扫描登录原理

1. 场景描述

为了照顾可能对扫码登录不太了解的同学,这里简单的介绍一下它到底是个啥
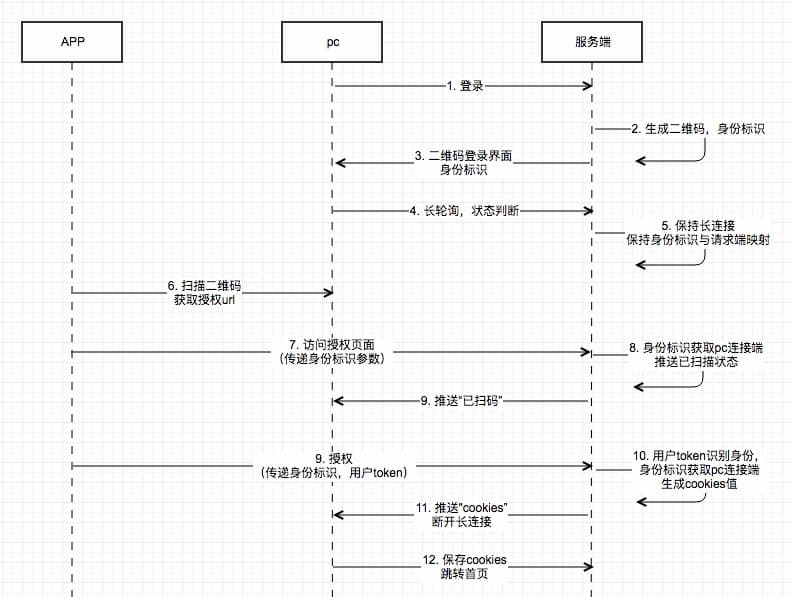
一般来说,扫码登录,涉及两端,三个步骤

  • pc 端,登录某个网站,这个网站的登录方式和传统的用户名/密码(手机号/验证码)不一样,显示的是一个二维码
  • app 端,用这个网站的 app,首先确保你是登录的状态,然后扫描二维码,弹出一个登录授权的页面,点击授权
  • pc 端登录成功,自动跳转到首页

2. 原理与流程简述

整个系统的设计中,最核心的一点就是手机端扫码之后,pc 登录成功,这个是什么原理呢?

  • 我们假定 app 与后端通过 token 进行身份标识
  • app 扫码授权,并传递 token 给后端,后端根据 token 可以确定是谁在 pc 端发起登录请求
  • 后端将登录成功状态写回给 pc 请求者并跳转首页(这里相当于一般的用户登录成功之后的流程,可以选择 session、cookie 或者 jwt)

借助上面的原理,进行逐步的要点分析

  • pc 登录,生成二维码

    • 二维码要求唯一,并绑定请求端身份(否则假定两个人的二维码一致,一个人扫码登录了,另外一个岂不是也登录了?)
    • 客户端与服务端保持连接,以便收到后续的登录成功并调首页的事件(可以选择方案比较多,如轮询,长连接推送)
  • app 扫码,授权登录

    • 扫码之后,跳转授权页面(所以二维码对应的应该是一个 url)
    • 授权(身份确定,将身份信息与 pc 请求端绑定,并跳转首页)

最终我们选定的业务流程关系如下图:

在这里插入图片描述

II. 实现

接下来进入项目开发阶段,针对上面的流程图进行逐一的实现

1. 项目环境

首先常见一个 SpringBoot 工程项目,选择版本2.2.1.RELEASE

pom 依赖如下

1
2
3
4
5
6
7
8
9
10
11
12
13
14
15
16
17
18
19
20
21
22
23
24
25
26
27
28
29
30
31
32
33
34
35
36
37
38
39
40
41
42
43
44
45
46
47
48
49
50
51
52
53
54
55
<parent>
<groupId>org.springframework.boot</groupId>
<artifactId>spring-boot-starter-parent</artifactId>
<version>2.2.1.RELEASE</version>
<relativePath/> <!-- lookup parent from repository -->
</parent>

<properties>
<project.build.sourceEncoding>UTF-8</project.build.sourceEncoding>
<project.reporting.outputEncoding>UTF-8</project.reporting.outputEncoding>
<java.version>1.8</java.version>
</properties>

<dependencies>
<dependency>
<groupId>org.springframework.boot</groupId>
<artifactId>spring-boot-starter-web</artifactId>
</dependency>

<dependency>
<groupId>com.github.hui.media</groupId>
<artifactId>qrcode-plugin</artifactId>
<version>2.2</version>
</dependency>

<dependency>
<groupId>org.springframework.boot</groupId>
<artifactId>spring-boot-starter-thymeleaf</artifactId>
</dependency>
</dependencies>

<build>
<pluginManagement>
<plugins>
<plugin>
<groupId>org.springframework.boot</groupId>
<artifactId>spring-boot-maven-plugin</artifactId>
</plugin>
</plugins>
</pluginManagement>
</build>
<repositories>
<repository>
<id>spring-releases</id>
<name>Spring Releases</name>
<url>https://repo.spring.io/libs-release-local</url>
<snapshots>
<enabled>false</enabled>
</snapshots>
</repository>
<repository>
<id>yihui-maven-repo</id>
<url>https://raw.githubusercontent.com/liuyueyi/maven-repository/master/repository</url>
</repository>
</repositories>

关键依赖说明

  • qrcode-plugin: 不是我吹,这可能是 java 端最好用、最灵活、还支持生成各种酷炫二维码的工具包,目前最新版本2.2,在引入依赖的时候,请指定仓库地址https://raw.githubusercontent.com/liuyueyi/maven-repository/master/repository
  • spring-boot-starter-thymeleaf: 我们选择的模板渲染引擎,这里并没有采用前后端分离,一个项目包含所有的功能点

配置文件application.yml

1
2
3
4
5
6
7
8
9
10
server:
port: 8080

spring:
thymeleaf:
mode: HTML
encoding: UTF-8
servlet:
content-type: text/html
cache: false

获取本机 ip

提供一个获取本机 ip 的工具类,避免硬编码 url,导致不通用

1
2
3
4
5
6
7
8
9
10
11
12
13
14
15
16
17
18
19
20
21
22
23
24
25
26
27
28
29
30
31
32
33
34
35
36
37
38
39
40
41
42
43
44
import java.net.*;
import java.util.Enumeration;

public class IpUtils {
public static final String DEFAULT_IP = "127.0.0.1";

/**
* 直接根据第一个网卡地址作为其内网ipv4地址,避免返回 127.0.0.1
*
* @return
*/
public static String getLocalIpByNetcard() {
try {
for (Enumeration<NetworkInterface> e = NetworkInterface.getNetworkInterfaces(); e.hasMoreElements(); ) {
NetworkInterface item = e.nextElement();
for (InterfaceAddress address : item.getInterfaceAddresses()) {
if (item.isLoopback() || !item.isUp()) {
continue;
}
if (address.getAddress() instanceof Inet4Address) {
Inet4Address inet4Address = (Inet4Address) address.getAddress();
return inet4Address.getHostAddress();
}
}
}
return InetAddress.getLocalHost().getHostAddress();
} catch (SocketException | UnknownHostException e) {
return DEFAULT_IP;
}
}

private static volatile String ip;

public static String getLocalIP() {
if (ip == null) {
synchronized (IpUtils.class) {
if (ip == null) {
ip = getLocalIpByNetcard();
}
}
}
return ip;
}
}

2. 登录接口

@CrossOrigin注解来支持跨域,因为后续我们测试的时候用localhost来访问登录界面;但是 sse 注册是用的本机 ip,所以会有跨域问题,实际的项目中可能并不存在这个问题

登录页逻辑,访问之后返回的一张二维码,二维码内容为登录授权 url

1
2
3
4
5
6
7
8
9
10
11
12
13
14
15
16
17
18
19
20
21
22
23
24
25
26
@CrossOrigin
@Controller
public class QrLoginRest {
@Value(("${server.port}"))
private int port;

@GetMapping(path = "login")
public String qr(Map<String, Object> data) throws IOException, WriterException {
String id = UUID.randomUUID().toString();
// IpUtils 为获取本机ip的工具类,本机测试时,如果用127.0.0.1, localhost那么app扫码访问会有问题哦
String ip = IpUtils.getLocalIP();

String pref = "http://" + ip + ":" + port + "/";
data.put("redirect", pref + "home");
data.put("subscribe", pref + "subscribe?id=" + id);


String qrUrl = pref + "scan?id=" + id;
// 下面这一行生成一张宽高200,红色,圆点的二维码,并base64编码
// 一行完成,就这么简单省事,强烈安利
String qrCode = QrCodeGenWrapper.of(qrUrl).setW(200).setDrawPreColor(Color.RED)
.setDrawStyle(QrCodeOptions.DrawStyle.CIRCLE).asString();
data.put("qrcode", DomUtil.toDomSrc(qrCode, MediaType.ImageJpg));
return "login";
}
}

请注意上面的实现,我们返回的是一个视图,并传递了三个数据

  • redirect: 跳转 url(app 授权之后,跳转的页面)
  • subscribe: 订阅 url(用户会访问这个 url,开启长连接,接收服务端推送的扫码、登录事件)
  • qrcode: base64 格式的二维码图片

注意:subscribeqrcode都用到了全局唯一 id,后面的操作中,这个参数很重要
接着时候对应的 html 页面,在resources/templates文件下,新增文件login.html

1
2
3
4
5
6
7
8
9
10
11
12
13
14
15
16
17
18
19
20
21
22
23
24
25
26
27
28
29
30
31
32
33
34
35
36
37
38
39
40
41
42
43
44
<!DOCTYPE html>
<html xmlns:th="http://www.thymeleaf.org">
<head>
<meta charset="UTF-8">
<meta name="viewport" content="width=device-width, initial-scale=1">
<meta name="description" content="SpringBoot thymeleaf"/>
<meta name="author" content="YiHui"/>
<meta name="viewport" content="width=device-width, initial-scale=1.0"/>
<title>二维码界面</title>
</head>
<body>

<div>
<div class="title">请扫码登录</div>
<img th:src="${qrcode}"/>
<div id="state" style="display: none"></div>

<script th:inline="javascript">
var stateTag = document.getElementById('state');

var subscribeUrl = [[${subscribe}]];
var source = new EventSource(subscribeUrl);
source.onmessage = function (event) {
text = event.data;
console.log("receive: " + text);
if (text == 'scan') {
stateTag.innerText = '已扫描';
stateTag.style.display = 'block';
} else if (text.startsWith('login#')) {
// 登录格式为 login#cookie
var cookie = text.substring(6);
document.cookie = cookie;
window.location.href = [[${redirect}]];
source.close();
}
};

source.onopen = function (evt) {
console.log("开始订阅");
}
</script>
</div>
</body>
</html>

请注意上面的 html 实现,id 为 state 这个标签默认是不可见的;通过EventSource来实现 SSE(优点是实时且自带重试功能),并针对返回的结果进行了格式定义

  • 若接收到服务端 scan 消息,则修改 state 标签文案,并设置为可见
  • 若接收到服务端 login#cookie 格式数据,表示登录成功,#后面的为 cookie,设置本地 cookie,然后重定向到主页,并关闭长连接

其次在 script 标签中,如果需要访问传递的参数,请注意下面两点

  • 需要在 script 标签上添加th:inline="javascript"
  • [[${}]] 获取传递参数

3. sse 接口

前面登录的接口中,返回了一个sse的注册接口,客户端在访问登录页时,会访问这个接口,按照我们前面的 sse 教程文档,可以如下实现

1
2
3
4
5
6
7
8
9
10
11
private Map<String, SseEmitter> cache = new ConcurrentHashMap<>();

@GetMapping(path = "subscribe", produces = {org.springframework.http.MediaType.TEXT_EVENT_STREAM_VALUE})
public SseEmitter subscribe(String id) {
// 设置五分钟的超时时间
SseEmitter sseEmitter = new SseEmitter(5 * 60 * 1000L);
cache.put(id, sseEmitter);
sseEmitter.onTimeout(() -> cache.remove(id));
sseEmitter.onError((e) -> cache.remove(id));
return sseEmitter;
}

4. 扫码接口

接下来就是扫描二维码进入授权页面的接口了,这个逻辑就比较简单了

1
2
3
4
5
6
7
8
9
10
11
12
13
14
@GetMapping(path = "scan")
public String scan(Model model, HttpServletRequest request) throws IOException {
String id = request.getParameter("id");
SseEmitter sseEmitter = cache.get(request.getParameter("id"));
if (sseEmitter != null) {
// 告诉pc端,已经扫码了
sseEmitter.send("scan");
}

// 授权同意的url
String url = "http://" + IpUtils.getLocalIP() + ":" + port + "/accept?id=" + id;
model.addAttribute("url", url);
return "scan";
}

用户扫码访问这个页面之后,会根据传过来的 id,定位对应的 pc 客户端,然后发送一个scan的信息
授权页面简单一点实现,加一个授权的超链就好,然后根据实际的情况补上用户 token(由于并没有独立的 app 和用户体系,所以下面作为演示,就随机生成一个 token 来替代)

1
2
3
4
5
6
7
8
9
10
11
12
13
14
15
16
17
18
19
20
21
22
23
24
25
26
27
28
29
30
31
32
33
34
35
36
37
38
<!DOCTYPE html>
<html xmlns:th="http://www.thymeleaf.org">
<head>
<meta charset="UTF-8">
<meta name="viewport" content="width=device-width, initial-scale=1">
<meta name="description" content="SpringBoot thymeleaf"/>
<meta name="author" content="YiHui"/>
<meta name="viewport" content="width=device-width, initial-scale=1.0"/>
<title>扫码登录界面</title>
</head>
<body>

<div>
<div class="title">确定登录嘛?</div>

<div>
<a id="login">登录</a>
</div>

<script th:inline="javascript">

// 生成uuid,模拟传递用户token
function guid() {

return 'xxxxxxxx-xxxx-4xxx-yxxx-xxxxxxxxxxxx'.replace(/[xy]/g, function (c) {
var r = Math.random() * 16 | 0, v = c == 'x' ? r : (r & 0x3 | 0x8);
return v.toString(16);

});
}

// 获取实际的token,补齐参数,这里只是一个简单的模拟
var url = [[${url}]];
document.getElementById("login").href = url + "&token=" + guid();
</script>
</div>
</body>
</html>

5. 授权接口

点击上面的授权超链之后,就表示登录成功了,我们后端的实现如下

1
2
3
4
5
6
7
8
9
10
11
12
13
@ResponseBody
@GetMapping(path = "accept")
public String accept(String id, String token) throws IOException {
SseEmitter sseEmitter = cache.get(id);
if (sseEmitter != null) {
// 发送登录成功事件,并携带上用户的token,我们这里用cookie来保存token
sseEmitter.send("login#qrlogin=" + token);
sseEmitter.complete();
cache.remove(id);
}

return "登录成功: " + token;
}

6. 首页

用户授权成功之后,就会自动跳转到首页了,我们在首页就简单一点,搞一个欢迎的文案即可

1
2
3
4
5
6
7
8
9
10
11
@GetMapping(path = {"home", ""})
@ResponseBody
public String home(HttpServletRequest request) {
Cookie[] cookies = request.getCookies();
if (cookies == null || cookies.length == 0) {
return "未登录!";
}

Optional<Cookie> cookie = Stream.of(cookies).filter(s -> s.getName().equalsIgnoreCase("qrlogin")).findFirst();
return cookie.map(cookie1 -> "欢迎进入首页: " + cookie1.getValue()).orElse("未登录!");
}

7. 实测

到此一个完整的登录授权已经完成,可以进行实际操作演练了,下面是一个完整的演示截图(虽然我并没有真的用 app 进行扫描登录,而是识别二维码地址,在浏览器中进行授权,实际并不影响整个过程,你用二维扫一扫授权效果也是一样的)

在这里插入图片描述

请注意上面截图的几个关键点

  • 扫码之后,登录界面二维码下面会显示已扫描的文案
  • 授权成功之后,登录界面会主动跳转到首页,并显示欢迎 xxx,而
    且注意用户是一致的

8. 小结

实际的业务开发选择的方案可能和本文提出的并不太一样,也可能存在更优雅的实现方式(请有这方面经验的大佬布道一下),本文仅作为一个参考,不代表标准,不表示完全准确,如果把大家带入坑了,请留言(当然我是不会负责的 🙃)
上面演示了徒手撸了一个二维码登录的示例工程,主要用到了一下技术点

  • qrcode-plugin:生成二维码,再次强烈安利一个私以为 java 生态下最好用二维码生成工具包 github.com/liuyueyi/qu… (虽然吹得比较凶,但我并没有收广告费,因为这也是我写的 😂)
  • SSE: 服务端推送事件,服务端单通道通信,实现消息推送
  • SpringBoot/Thymeleaf: 演示项目基础环境
 wechat
欢迎您扫一扫上面的微信公众号,订阅我的个人公众号!
坚持技术分享!